New Year Sale: Save upto 50%!
Offer valid for a short period.
00
Days
00
Hours
00
Minutes
00
Seconds
New Year Sale: Save upto 50%!
Offer valid for a short period.
Increase Your Order Value With Smart Upsells
Personalize product recommendations, customize upsell offers, increase AOV, and boost sales with our all-in-one WooCommerce Upsell plugin.

WooCommerce order bump is a common strategy used by many store owners to increase customers’ order value and boost sales. When you order a burger at McDonald’s, the salesperson asks you for additional fries at the counter. It’s a real-life order bump experience for every person (not only you but also your customers).
Many online brands are also upselling on checkout pages to boost their sales. In fact, Research confirmed that upselling during checkout can increase the average order value by up to 30%. If you haven’t implemented this strategy in your store yet or are having trouble applying it to your store, this blog is for you.
We will discuss the step-by-step process of adding a WooCommerce order bump on checkout pages to increase purchase value. Moreover, I have included the best times, practices, and strategies to increase the effectiveness and sales using this upsell order bump strategy.
Increase your store AOV by 30% by showing customized WooCommerce order bumps at checkout using UpsellWP.
A WooCommerce order bump is a checkout-focused sales strategy where store owners display low-cost, relevant add-on products during checkout, allowing customers to add them to their order with a single click to increase average order value (AOV).
The secret to order bump WooCommerce offers lies in its framework. In the following screenshot, you can see the essential elements that are included in an order bump for a WooCommerce store.
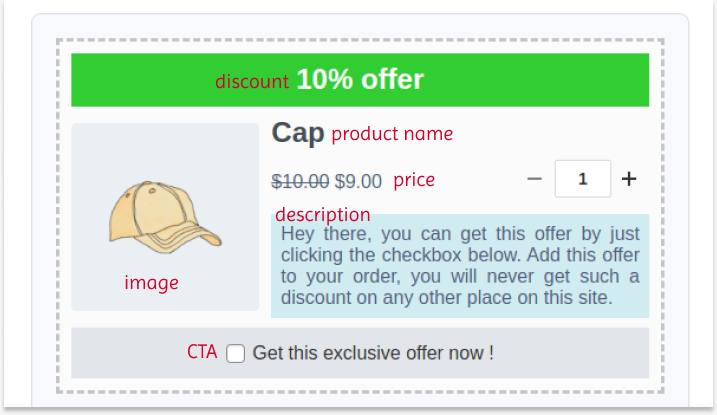
1. Discount: Highlight your offer and grab customers’ attention by displaying the discounts in this particular sale.
2. Image: The optional images are an extra visual element to the offer.
3. Product Name and Description: The basic product name is essential. The advantage of an order bump is that customers can get it without navigating to the product page. So, you can describe how to convince them to choose the offer.
4. Strikeout Price: You can strike out the original product price and show the discounted price to help customers see how much they can save.
5. CTA: The most essential element of this order bump template is the CTA button. Add an actionable CTA button to help customers add the offer to their cart in one click. The checkbox is optional based on your template design.
This is the basic and simple framework for an effective order bump campaign. You can add and customize other components to this framework that reflect your brand goal. Ensure you include all these elements to capture customers’ attention and increase order value.
Let’s explore some factors to check how upsell order bump offers for WooCommerce differ from the default upsell and cross-sell offers:
| Aspect | Order Bump | Upsell | Cross-sell |
| Primary Goal | Offer low-cost, complementary products that enhance the main purchase. | Encourage customers to upgrade to a higher-priced or better version. | Suggest related products that naturally go with the main item. |
| Customer Value | Adds extra value with minimal effort and no extra decision-making. | Provides more features, benefits, or performance. | Helps customers complete their purchase with useful add-ons. |
| Where It Appears | Shown only on the WooCommerce checkout page. | Can appear on product pages, cart page upsells, checkout, thank-you pages, and pop-ups. | Typically shown on product, cart, and thank-you pages. |
| Decision Effort | Very low — customers add the item with one click at checkout. | Higher — customers must consider a more expensive alternative. | Medium — customers decide if the additional product is needed. |
| AOV Impact | Increases AOV through small, impulse-friendly add-ons. | Increases AOV through higher-priced product upgrades. | Increases AOV by adding more items to the cart. |
| Real-world Example | Warranty, phone case, or headphones for an 8GB RAM smartphone. | Upgrading from an 8GB RAM phone to a 16GB RAM phone. | Screen protectors or charging cables for the smartphone. |
WooCommerce order bump can elevate your store’s performance in many ways:
You need a plugin like “UpsellWP” to add a WooCommerce order bump, as the default settings do not have this feature. To install the plugin in WooCommerce:
You can also check the pro version of the UpsellWP plugin to use advanced upselling features. Let’s check some scenarios of how you can add upsell order bump offers for WooCommerce checkout pages:
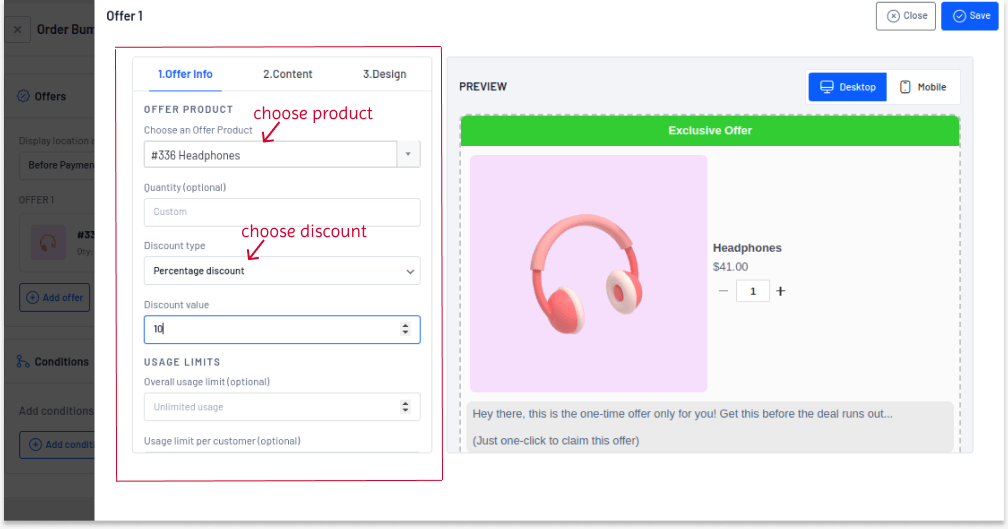
To add a simple WooCommerce order bump:
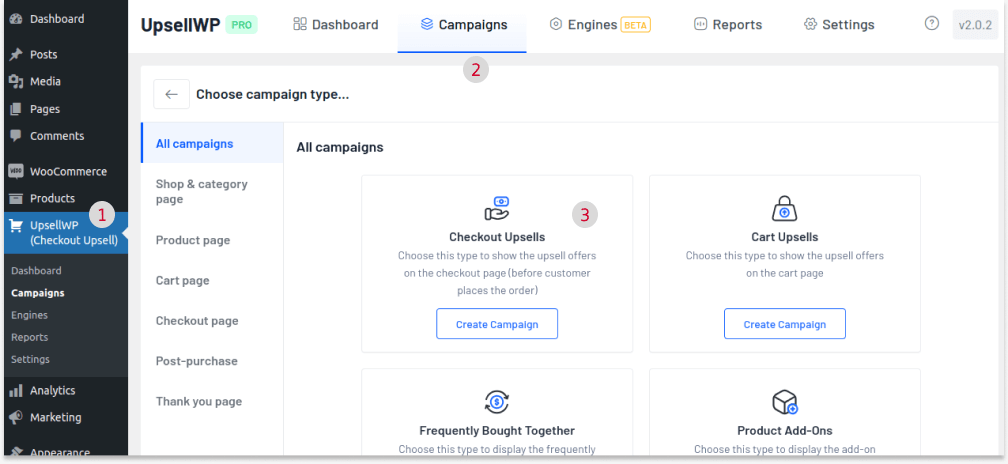
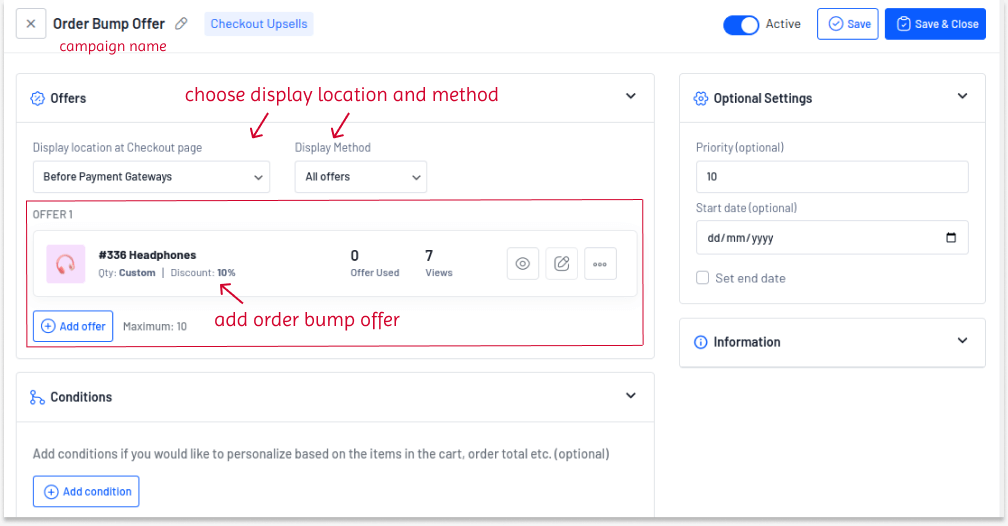
Let’s show “Headphones” as an order bump for musical instruments.
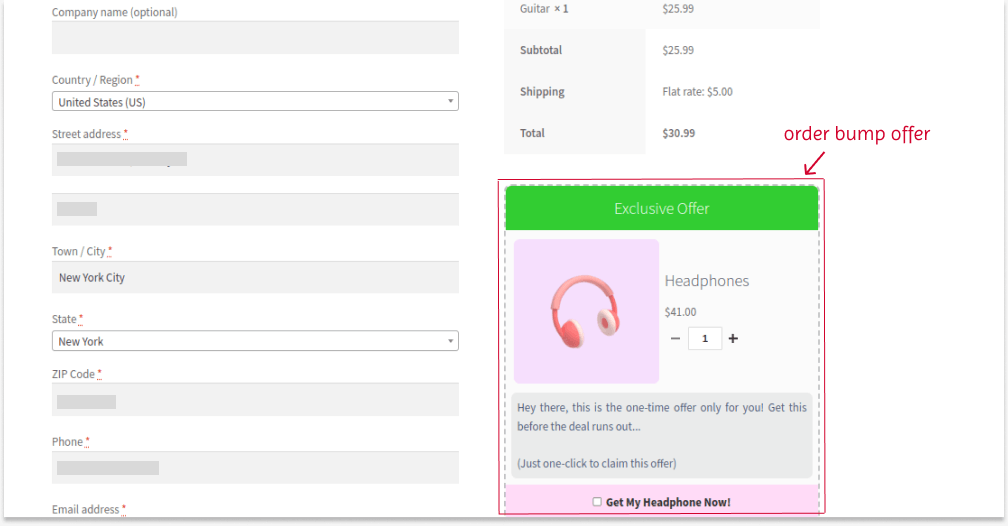
Improve customer satisfaction by showing personalized order bump offers specific to each customer to specific customers using UpselWP.
You can apply purchase conditions to upsell order bump offers. This upselling on checkout will be enabled only when customers meet those conditions.
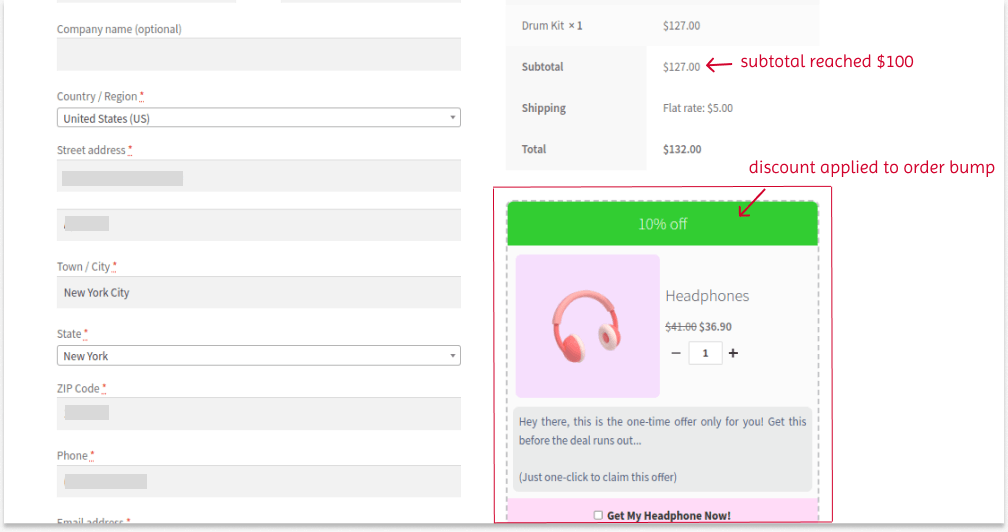
Example: Spend $100 and get 10% off on Headphones at checkout.
To add a WooCommerce upsell order bump based on cart total:
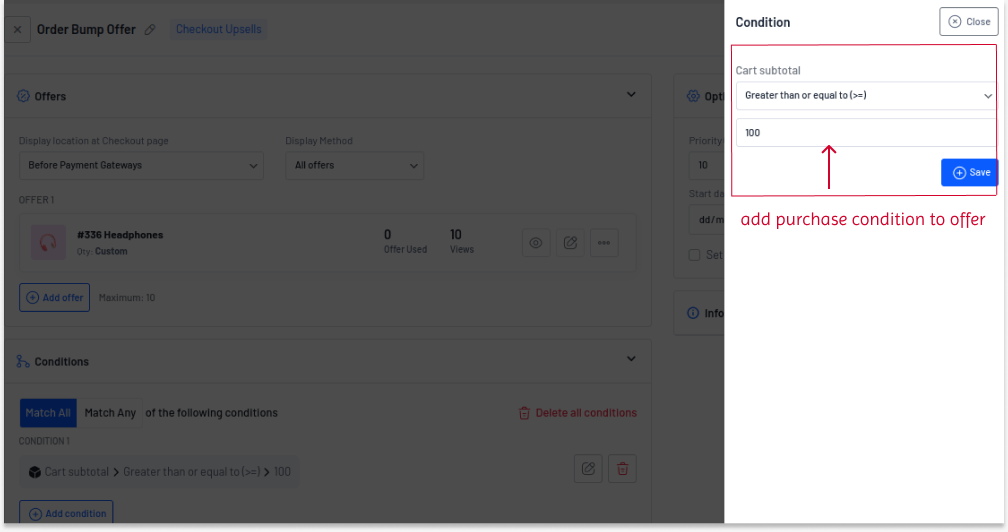
The 10% off order bump will be shown only when customers’ carts reach $100.
To appreciate loyal customers’ relationship with your brand, you can offer order bump offers only to specific user roles, such as subscribers, wholesale customers, or VIP (Membership) customers.
To add an “order bump WooCommerce” offer only to a specific customer role:
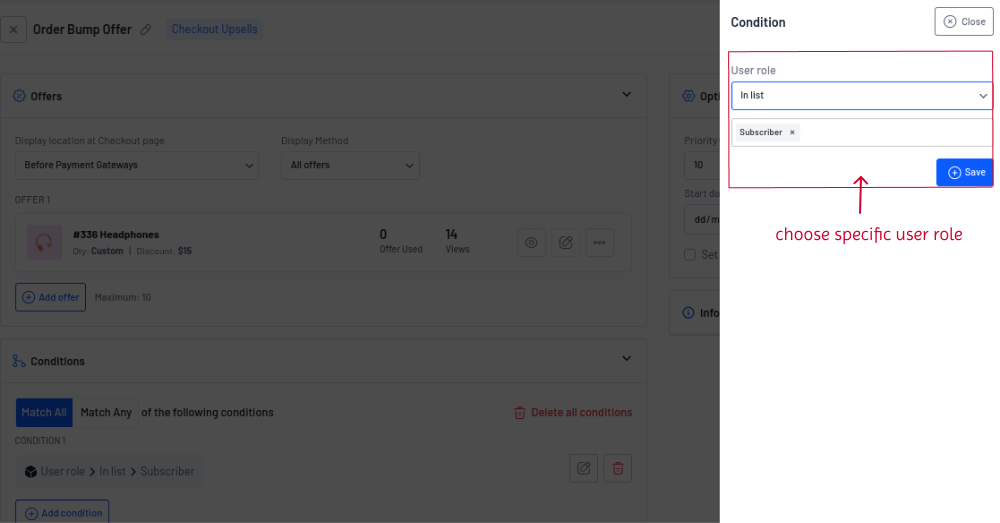
The customers who are segmented as “Subscribers” will only be offered a discounted order bump offer.
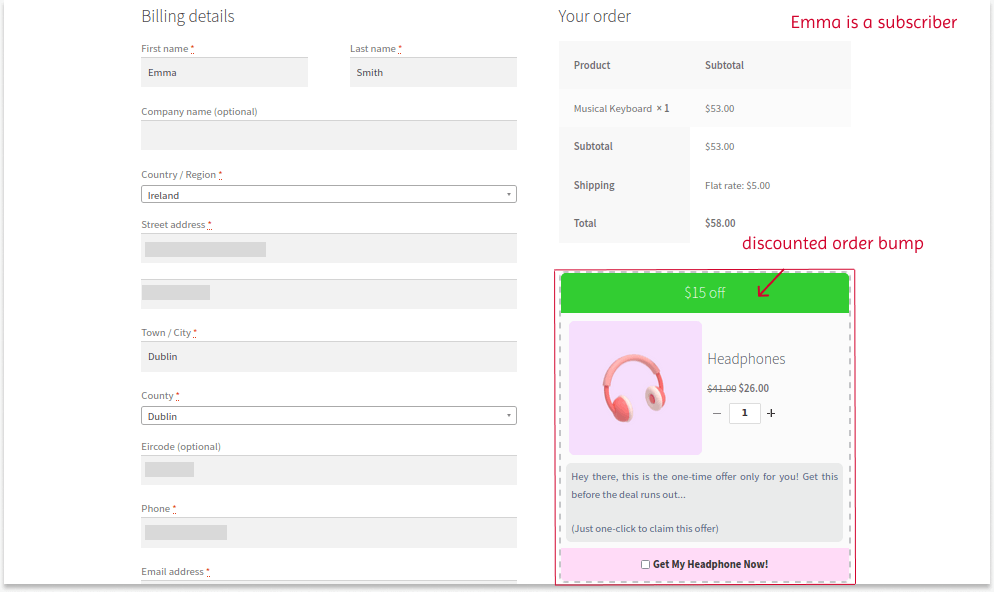
You can also create this checkout upsell offer only for specific customers by selecting “Specific users” as a condition and selecting the users with their names.
Help Guide: How to create user roles in WooCommerce?
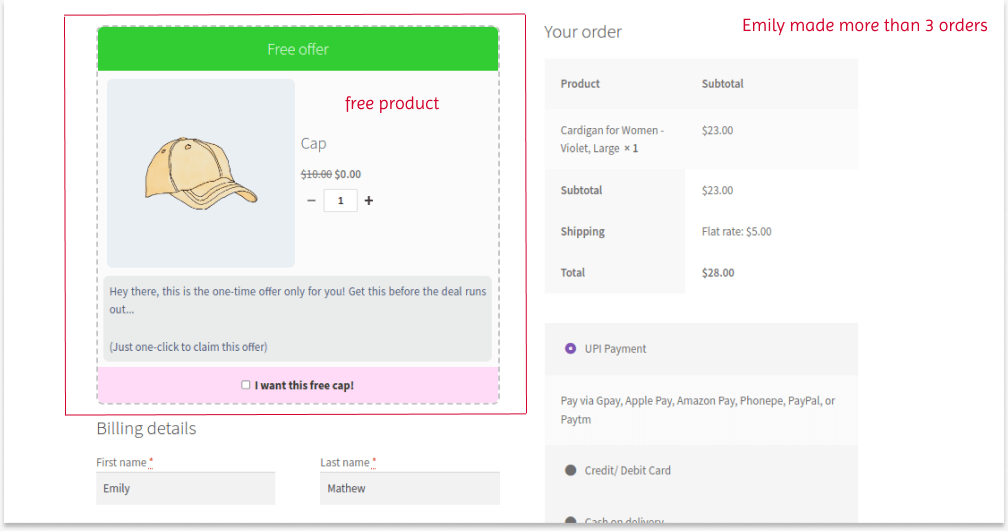
Instead of offering discounted products as an order bump, you can give customers a free product to reward their loyalty to your store. For example, let’s give a free product to customers who have made at least three purchases in the store.
To create a free order bump for WooCommerce stores:
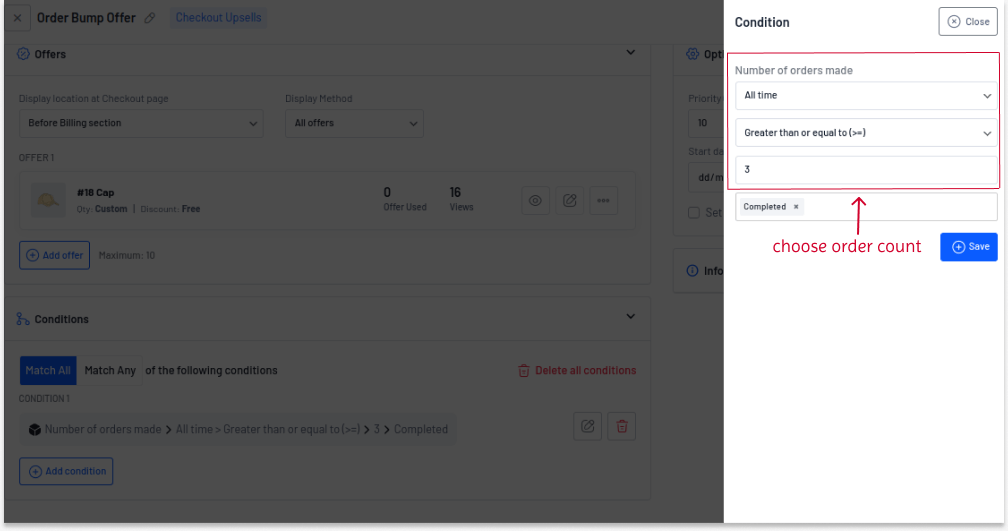
The free product will be available only to customers who have completed at least three orders. Also, the offer will be displayed based on the selected location.
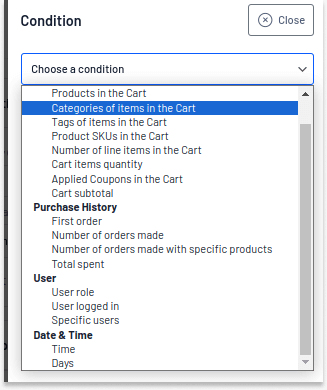
Note: This UpsellWP plugin also lets you create order bumps based on other conditions, such as:
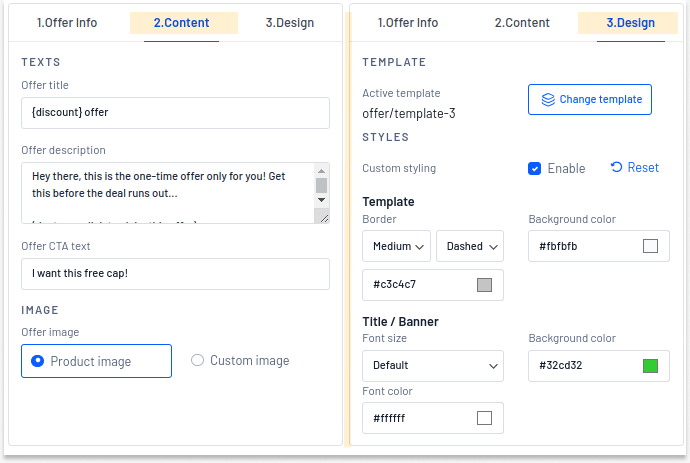
With the UpsellWP plugin, you can easily customize an order bump template that aligns with your brand.
To customize your checkout order bump template:
Note:
Order bumps will disappear once the customer adds them to their order.
To enable it even after adding it to the order:
If this option is disabled, customers can’t see or uncheck this option once the product is added to the order.
WooCommerce order bump deals will only be beneficial when shown at the right time. Here is when you can implement an order bump for WooCommerce checkout pages:
WooCommerce order bumps are a great option to increase your store’s revenue. However, it is important to follow some best practices to set an effective order bump for WooCommerce:
Checkout upsells are easier to implement and will result in high sales. If you are a beginner to upselling, check out these strategies to start creating order bumps for your WooCommerce stores:
Many popular brands use upsell order bumps as a profitable strategy. Let’s explore a few brands to see how they use the offer.
1. Amazon
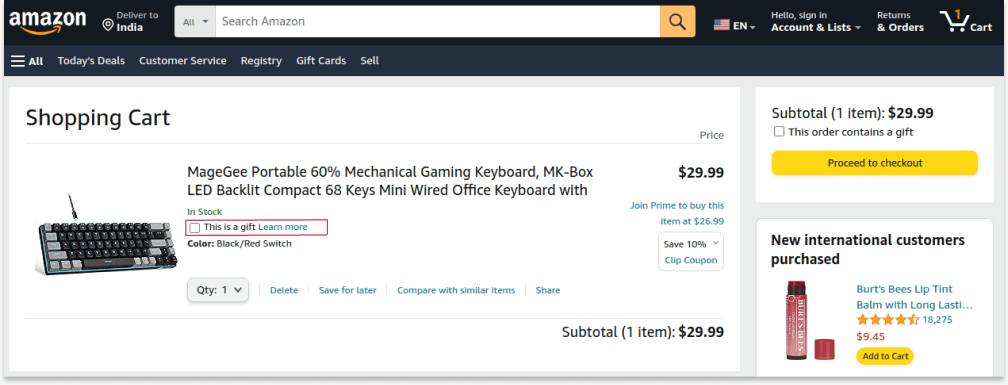
Amazon, the eCommerce giant, uses an order bump strategy to provide gifting options for the product. Customers can enable this option to send the product as a gift. This strategy helps customers simplify their gifting process.
2. Nike
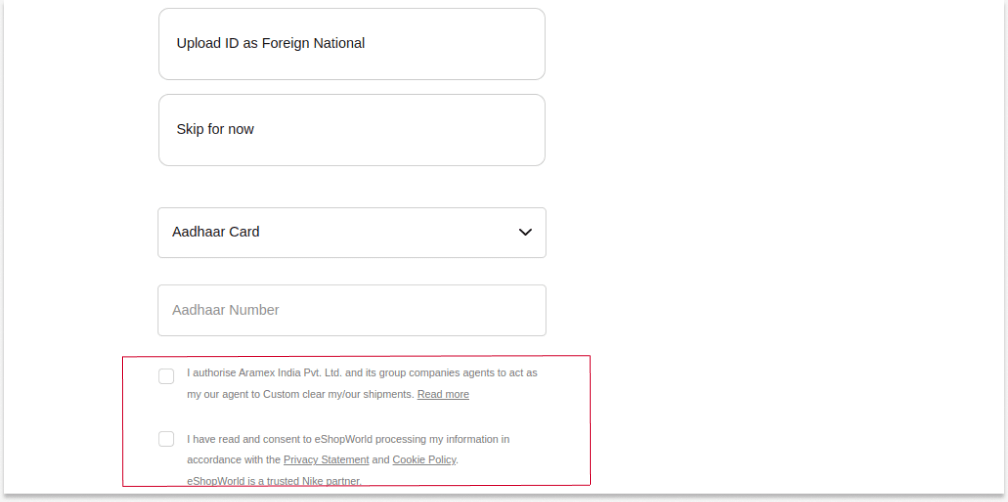
Nike, the most popular athletic apparel corporation, uses the order bump option to obtain customers’ declarations and consents.
This is one of the best ways to utilize order bump positions to enhance the shopping experience.
Tip: You can also utilize an order bump feature to ask customers to subscribe to your email list or join your membership program.
3. Apple
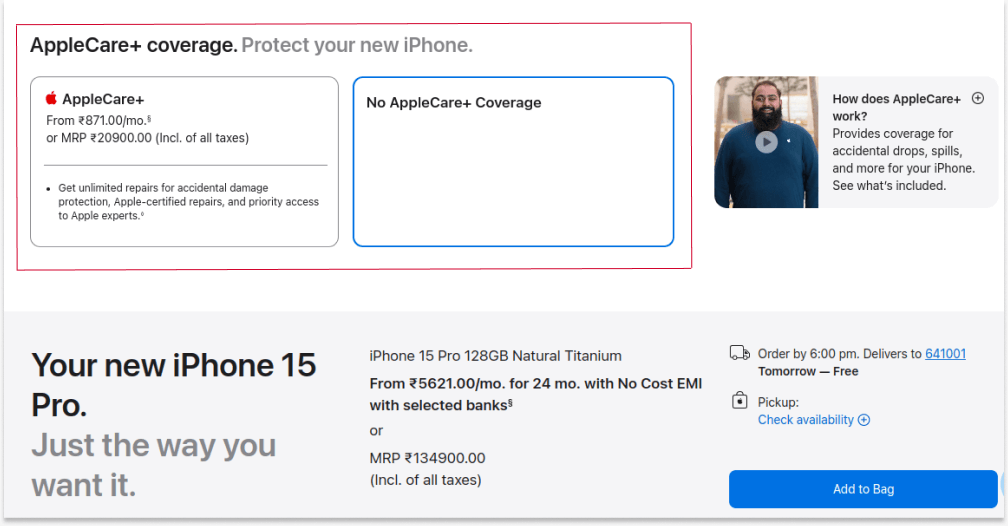
Apple is one of the best examples of checkout upsell offers. It uses order bump to provide Applecare service for iPhones, which helps the brand to increase its order value.
In real life, most of the brands like these are using order bumps to:
These are low-cost strategies to increase order value. You can use similar tactics to grow your store sales. Also, as discussed in scenarios, you can display related products to create a unique order bump strategy.
Increase conversion rate in your WooCommerce store by showing order bumps based on customer purchase history using UpsellWP.
WooCommerce order bump is a must-have strategy for every online store to increase its average transaction value. Order bumps increase order value and help customers explore additional valued products, enhance their experience, and retain customers.
As popular brands that rely on upsells at checkout, you can create order bumps for your WooCommerce store and make your brand a trustworthy place for customers to buy their favorite products. You can use UpsellWP, one of the best WooCommerce order bump plugins, to create advanced and personalized checkout upsell offers.
More Guides to Increase Order Value
Order bump is a versatile strategy that all online stores with all store sizes can use.
You can show related and low-cost products as an order bump to increase their impact.
Here are some ideas to get started with order bumps:
1. Warranty or service period for products.
2. Gift wrapping options.
3. Asking customers to join your “email newsletter” list or exclusive “membership” groups.
4. Showing low-cost product recommendations related to customers’ main product.
Here are some common mistakes to avoid:
1. Providing too many order bump offers
2. Not testing and finding the best-performing offer
3. Unclear offer layout and a message about discounts.
4. Not providing discounts on high-cost upsell products.
UpsellWP is a recommended plugin for creating order bump campaigns. The above resource guides also list the best plugins, so you can find the most suitable one for your store.
Both order bumps and cross-sells are less expensive product suggestions offered to customers to increase their order value. They differ in how they are placed in the store.
1. Order bumps can be shown on checkout pages, optionally with a checkbox to add it directly to the order, while
2. Cross-sells can be shown on products, carts, thank-you pages, and popups to increase sales at every step of the customer’s journey.
You can upsell products on product pages. But the term “order bump” refers to the upselling offer added on checkout pages.