Increase Your Order Value With Smart Upsells
Personalize product recommendations, customize upsell offers, increase AOV, and boost sales with our all-in-one WooCommerce Upsell plugin.

Missing out on the WooCommerce product add-on option can decrease your target customer traffic by 71%.
According to a Deloitte study, customers are more likely to buy when they can customize products to match their needs and preferences.
But, how do you provide product customization options in WooCommerce? The solution is showing personalized product add-ons.
With add-ons, customers can choose their preferences for the product. This can also help you show upsell and cross-sell items for the product to increase order value.
In this blog, let’s discuss WooCommerce product add-ons in detail.
You’ll learn to show product customization options with addons in your store in multiple ways using an UpsellWP plugin and explore real-life examples to personalize your customers’ shopping experiences.
Let’s get started.
Convert 30% of window shoppers into regular customers by offering product customizations using UpsellWP’s product add-on campaigns.
WooCommerce product add-ons are a strategy for showing product customization options, such as item colors, sizes, and other attributes, helping customers choose products based on their preferences, needs, and interests.
Using the product add-ons for WooCommerce, you can also suggest cross-sells and upsells based on customers’ main purchases. This helps enhance the customer experience and increase sales.
For example:
If a customer is buying a smartphone, you can provide them with WooCommerce product add-ons, such as:
Allowing customers to customize their products will help them happily complete their purchase with their favorites.
For a WooCommerce store owner like you, providing product add-ons gives benefits such as:
Showing WooCommerce product add-ons can be done with a plugin like UpsellWP, as it is unavailable in the default settings.
With plenty of product add-ons plugins available for WooCommerce, you can choose the best one with a personalized customization feature.
I’ve used the UpsellWP plugin for this guide, which has 10 pre-built upsell campaigns, including product and cart add-ons. Its easy-to-use interface simplifies the steps, and customization features help you customize your upsell suggestions based on your sales goal and brand.
To install the UpsellWP plugin:
To create a WooCommerce product add-on campaign:
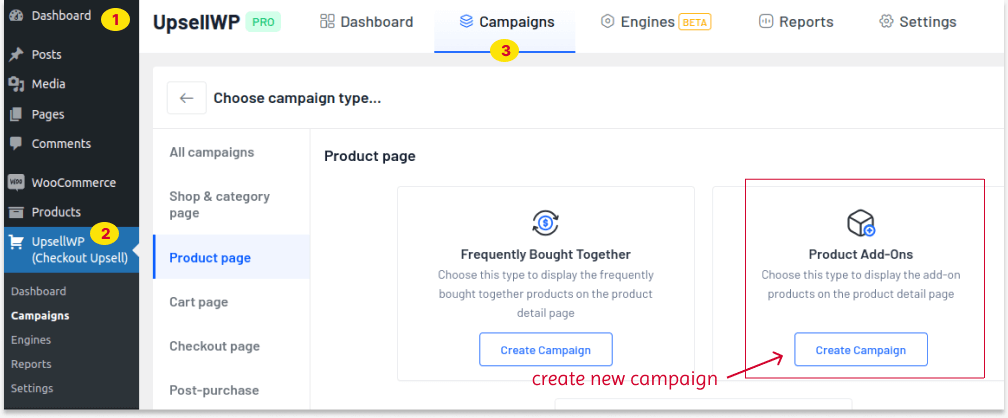
Now, let me show you how to create and display customized WooCommerce product add-ons in six ways.
You can use the “related products” method and show product add-ons for WooCommerce based on the same tags or categories.
For example, if a customer is looking for a “T-shirt,” the site automatically shows products from the same “T-shirt” categories or tags.
To show related product add-ons in WooCommerce:
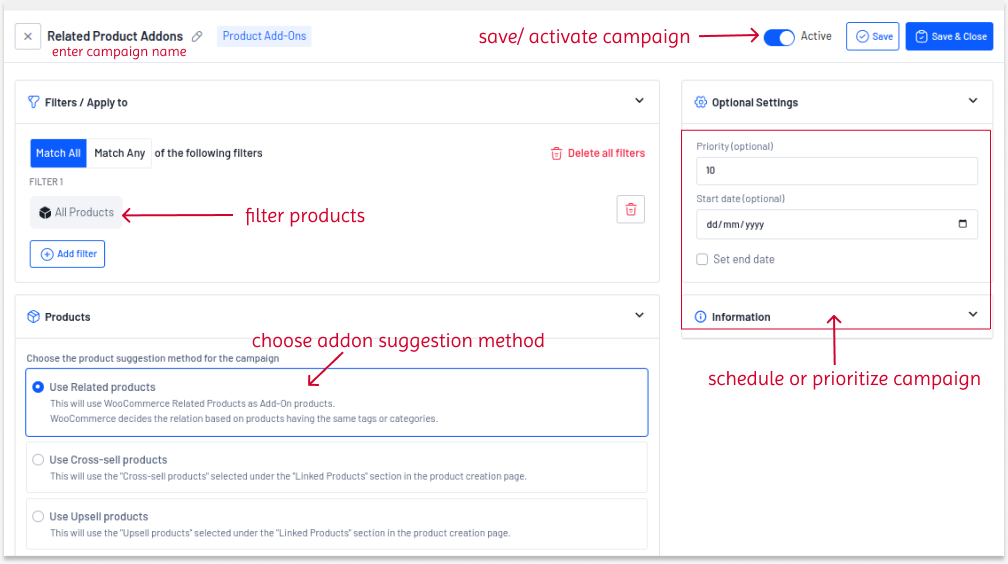
Note: The add-ons are grouped with the main products in the cart. To allow customers to remove only add-ons, you can enable the “Allow customers to remove Add-ons from the cart” option.
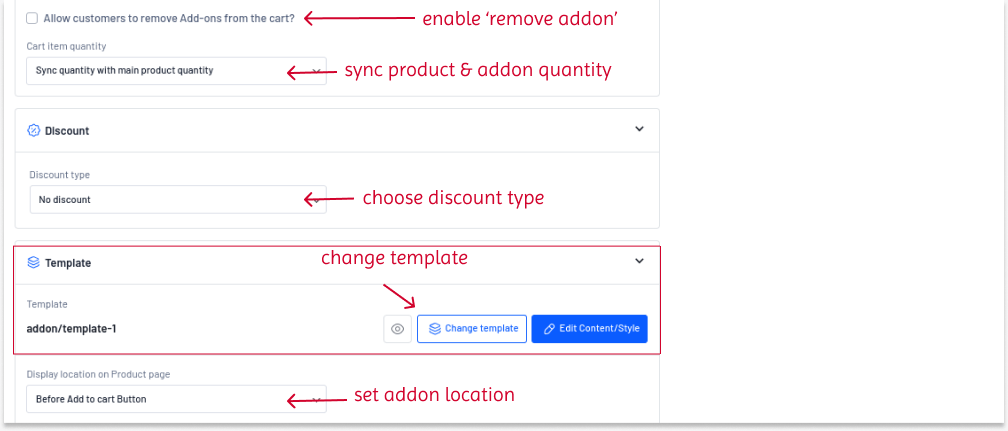
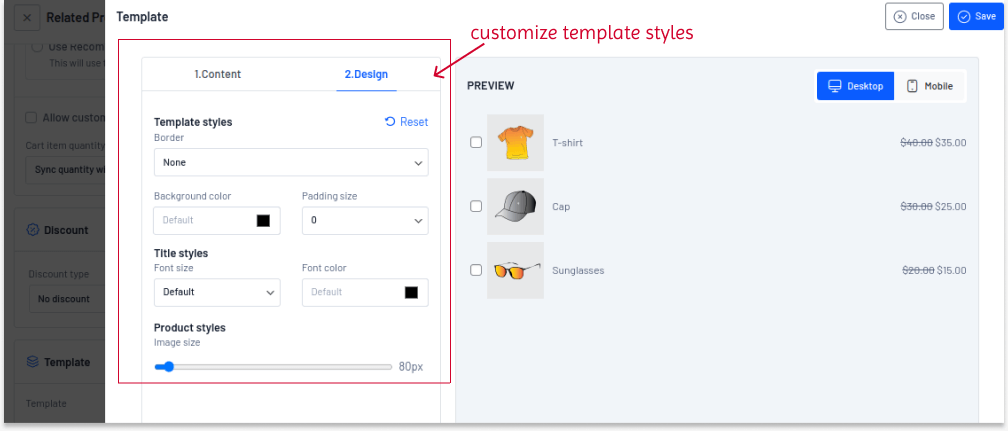
If you create multiple campaigns, you can use the “Priority” option to prioritize which campaigns to apply first.
When customers view a product, add-ons will be displayed from the same product categories or tags.
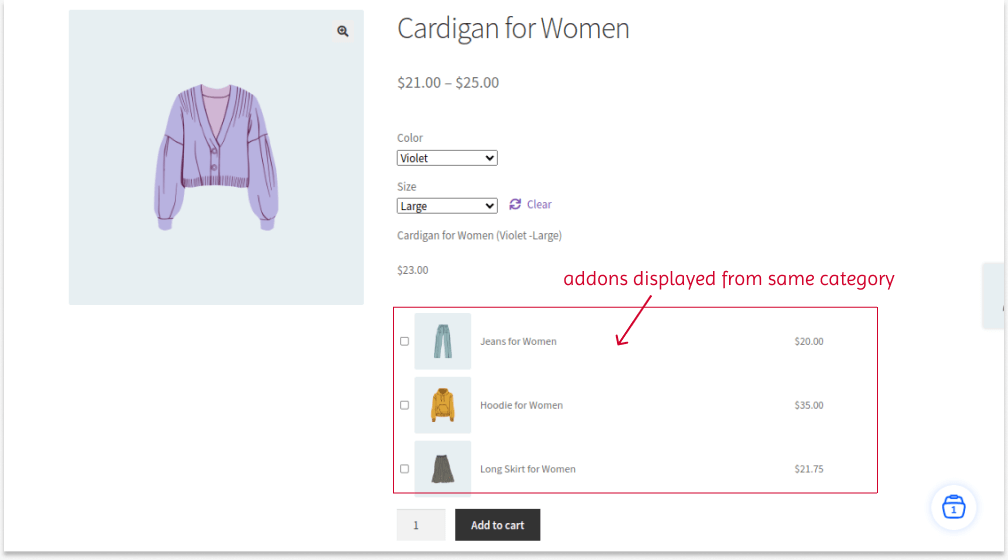
Related Read:
How to Add and Customize WooCommerce Related Products?
As you may know, upsells are upgraded product suggestions based on current products, and cross-sells complement the main item.
You can show these upsell and cross-sell suggestions as a product add-on to offer more product varieties and help customers explore your store.
To show upsells or cross-sells as WooCommerce product add-ons:
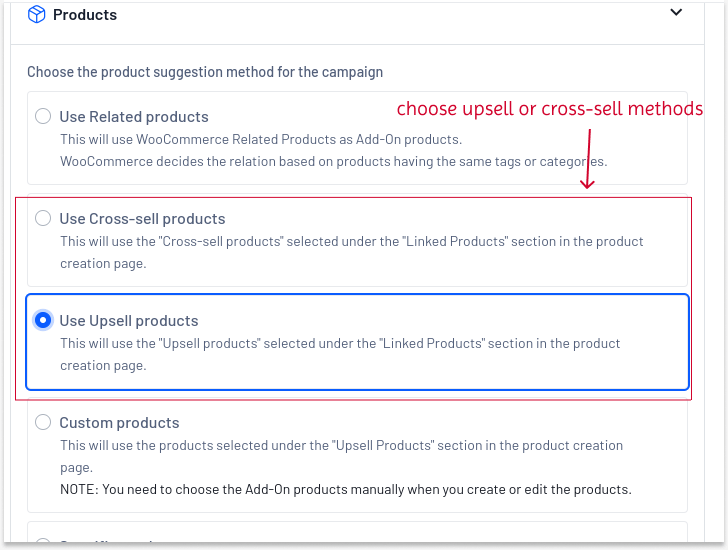
It will take products from the “Linked Products” section if you’ve already linked upsell or cross-sell items to your products.
If you do not know this default “Linked Products” option, you can use it to show upsells on product pages and cross-sells on cart pages. Check out this “Show cross-sells using default settings” blog to know about this option.
The plugin will show the linked upsell or cross-sell products as an add-on in this campaign.
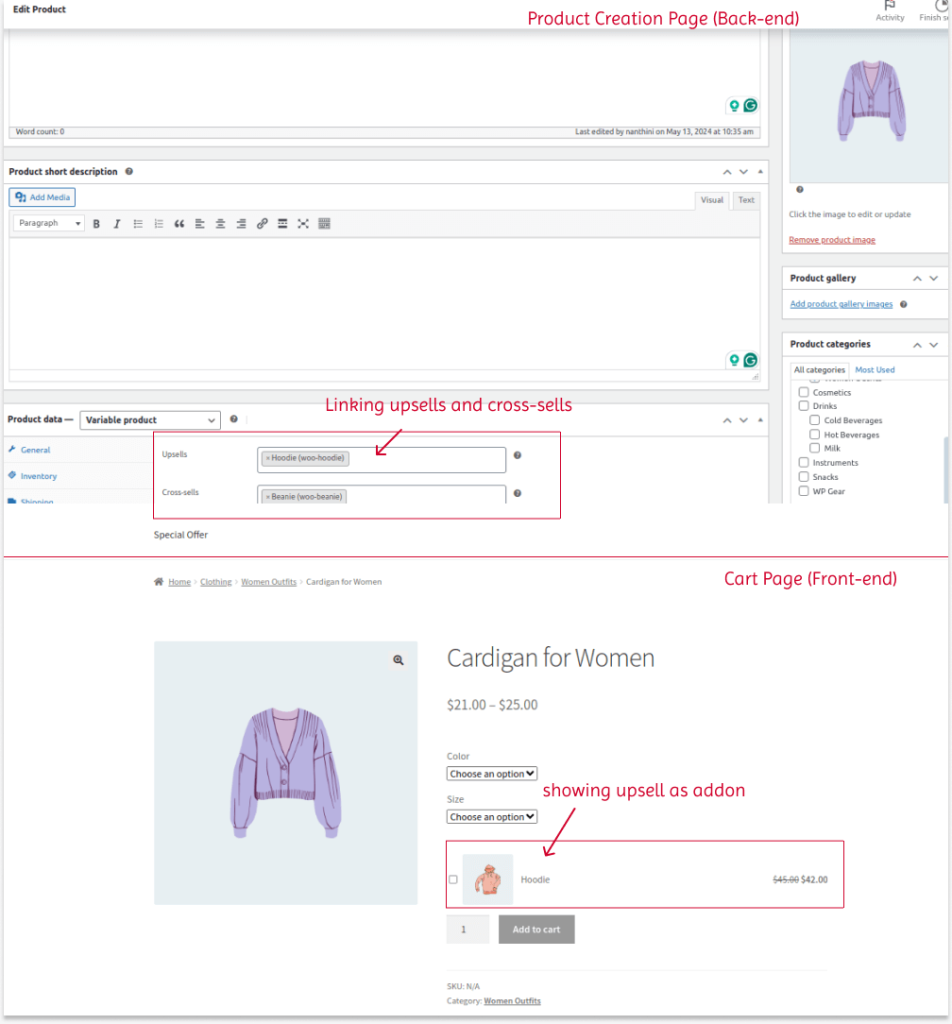
Note: I’ve included two methods (upsells and cross-sells) in these steps.
Show customized product add-ons in 6 different ways using UpsellWP to enhance customer experience and loyalty.
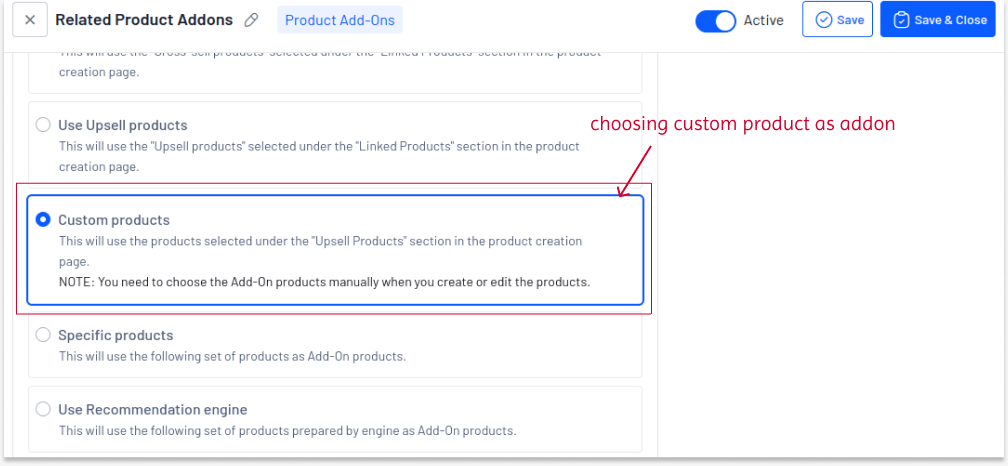
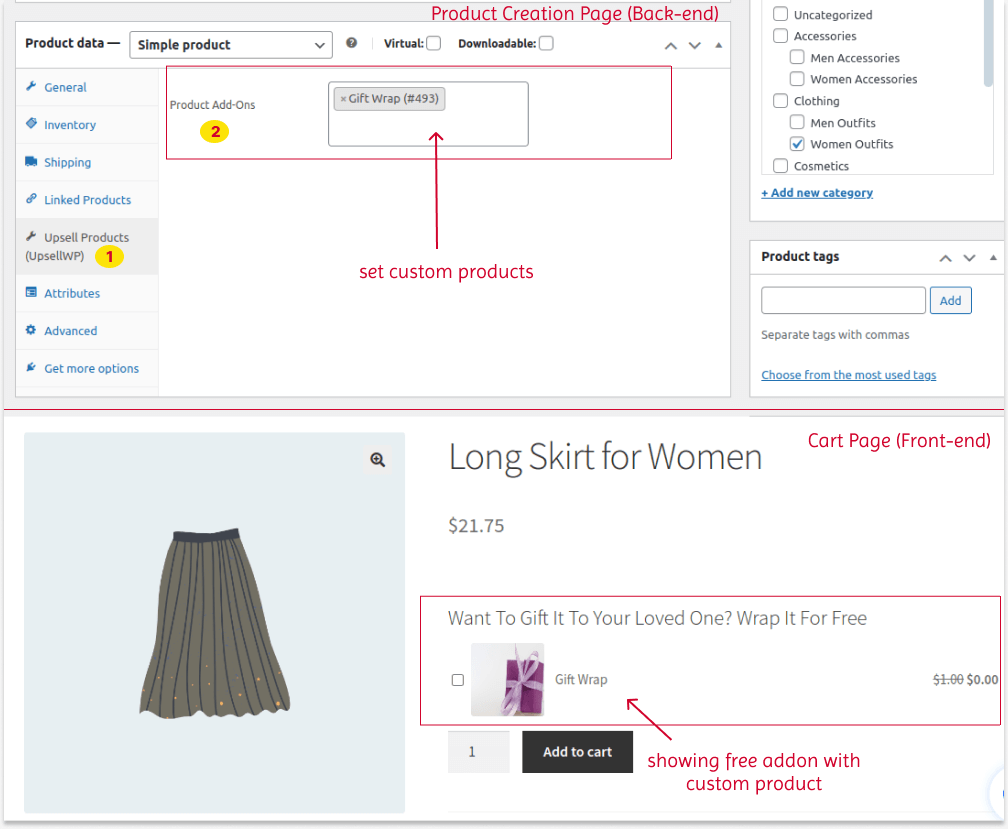
The UpsellWP plugin provides a dedicated add-on feature for each product. After installing this plugin in your WordPress dashboard and activating the “Product Add-ons” campaign, navigate to “Products”.
Add a new product or edit an existing product and scroll down to the “Product Data” section. Here, you can choose an option like “Upsell Products (UpsellWP)”.
From here, you can add custom products as an add-on suggestion to the main products.
After adding it, go to the “UpsellWP” dashboard to show these custom products as an add-on.
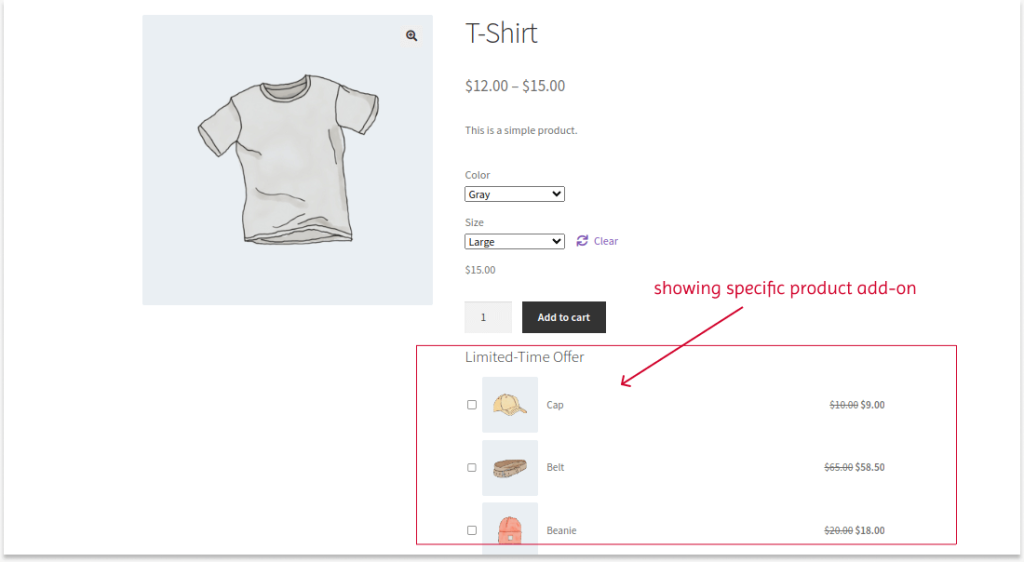
The “custom products” you added to the product will be shown as an add-on, and the chosen discount type will be applied. Here, the add-on will be offered for free.
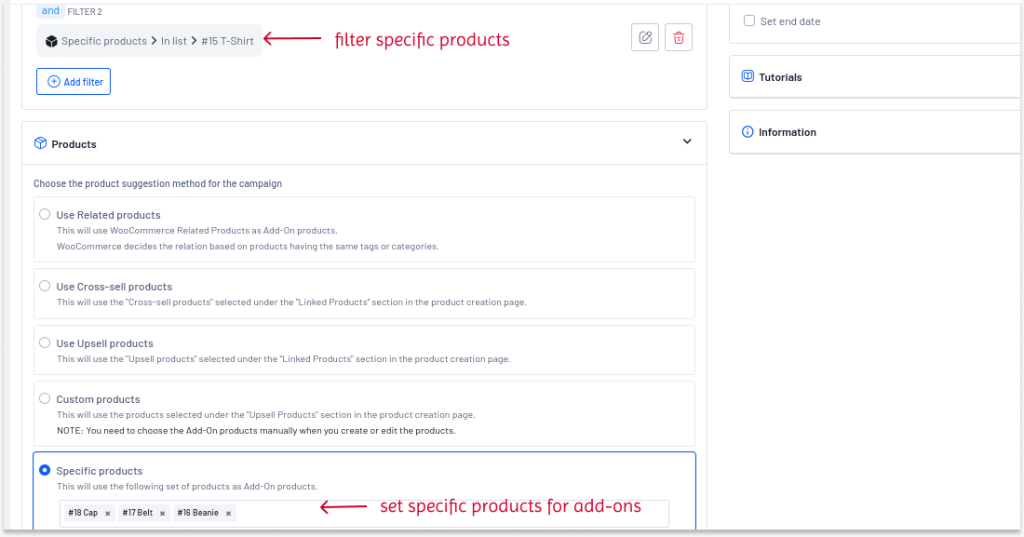
You can use this method to show specific items as add-ons for specific or all items.
To show specific items as a product add-on in WooCommerce:
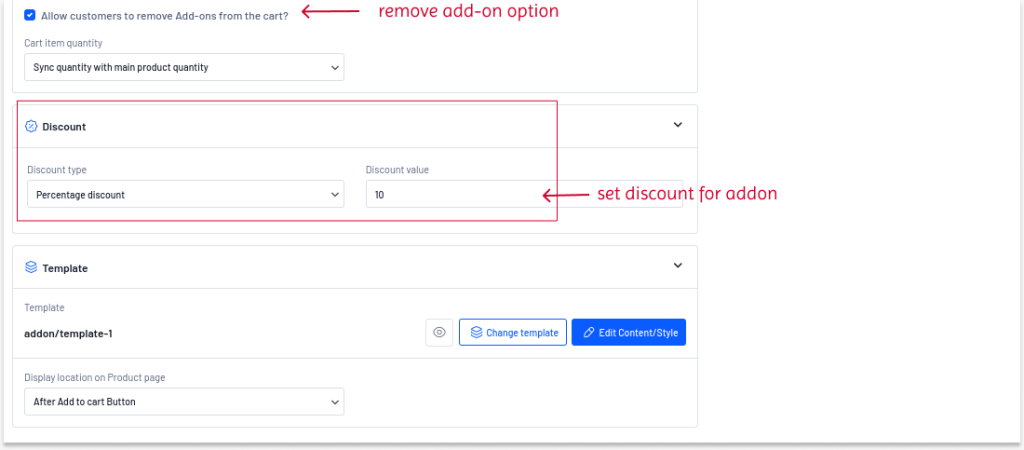
As we discussed before, you can change the add-on position before or after the “Add to Cart” button.
Also Check
How to Add WooCommerce Upsell Popups?
UpsellWP has a dedicated “Recommendation Engine”, which is an advanced tool for analyzing customer data and purchase patterns. The collected data will show the most relevant and needed products as upsell suggestions to enhance customer experience.
To know more about “Recommendation Engine”, and how to create one, you can check this page: “How to create and customize a recommendation engine”.
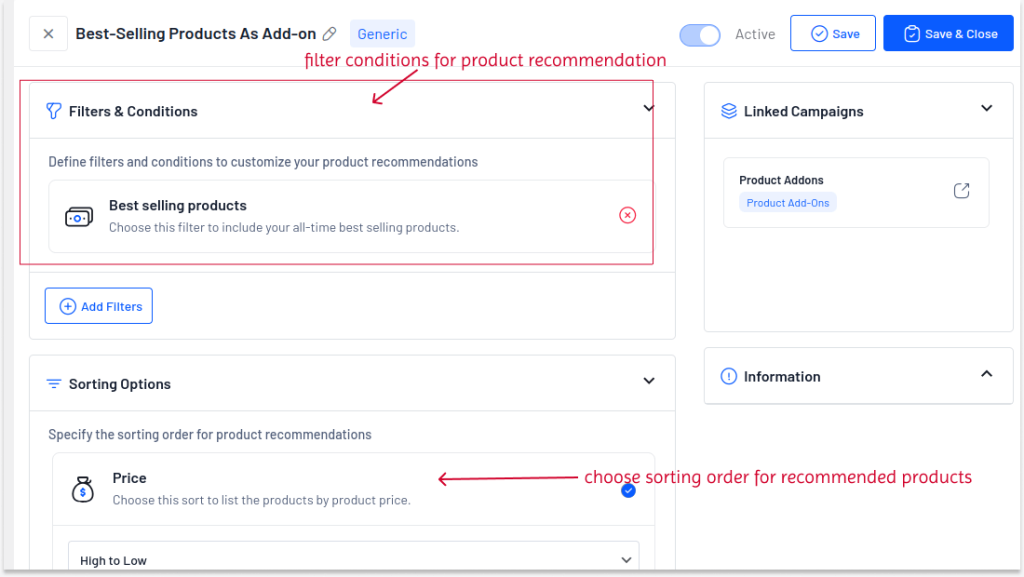
For example, we can display the best-selling products as an add-on. You can create a best-selling product engine and link it with a WooCommerce product add-on campaign.
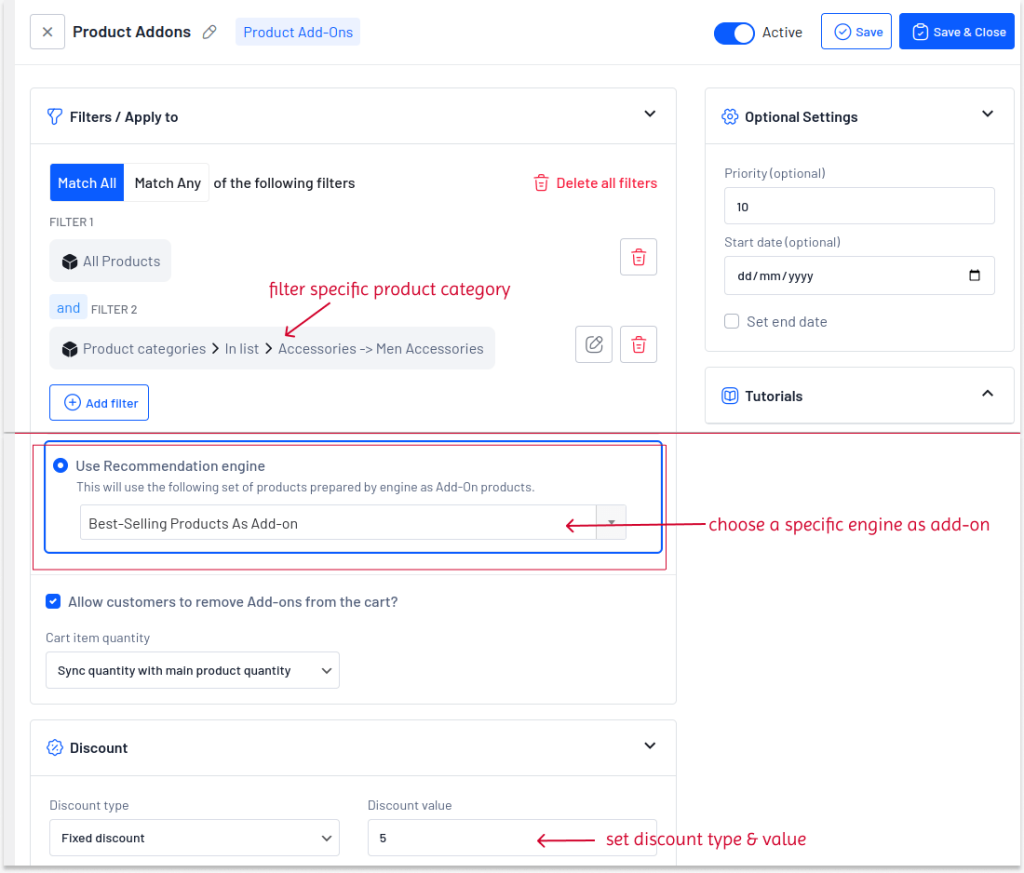
An Example of a Best-Selling Recommendation Engine:
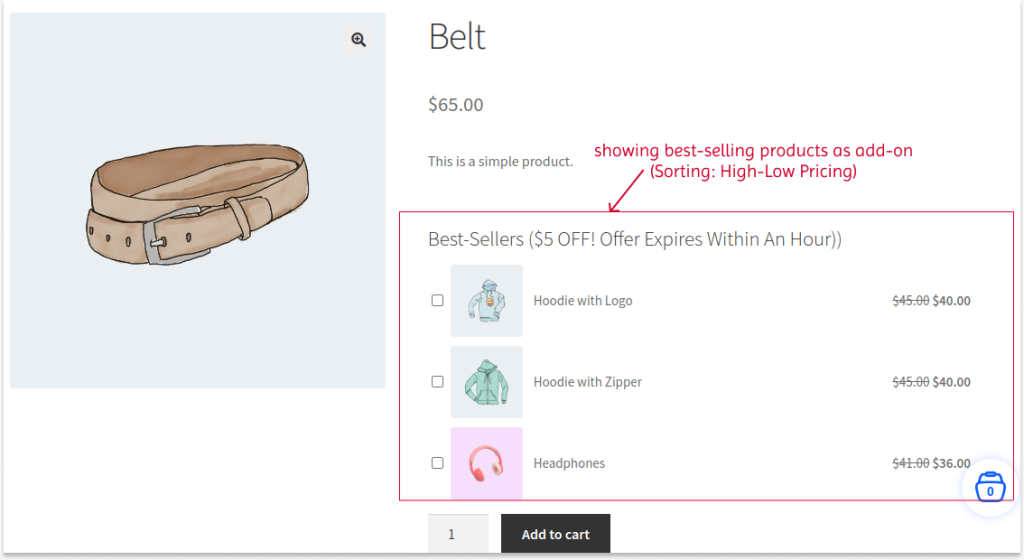
Now, the add-ons will display the best-selling products based on the selected sort option and discount type.
These are the six methods in UpsellWP to create and manage your WooCommerce product add-on campaigns.
Are these add-ons really applicable in real life? Let’s explore some examples to confirm it.
Product add-ons for WooCommerce are a profitable strategy when you show them in strategic ways.
Here are a few tips to show customization options for better conversions:
Related Read:
What is One-Click Upsell? 9 Strategies to Increase Upsell Sales.
In addition to the above upsell and cross-sell add-on suggestions, here is how popular brands utilize product add-ons in different ways:
1. Amazon’s Product Specs as an Add-on
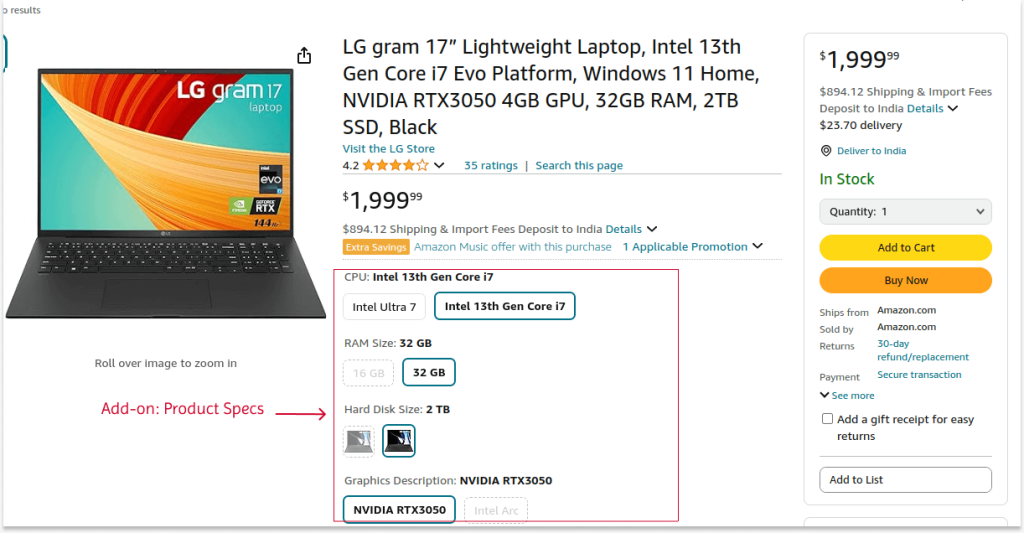
Amazon uses the add-on section to provide different product specifications. It helps customers to customize their product features based on their budget and needs.
2. Nike’s Product Sizes as an Add-on
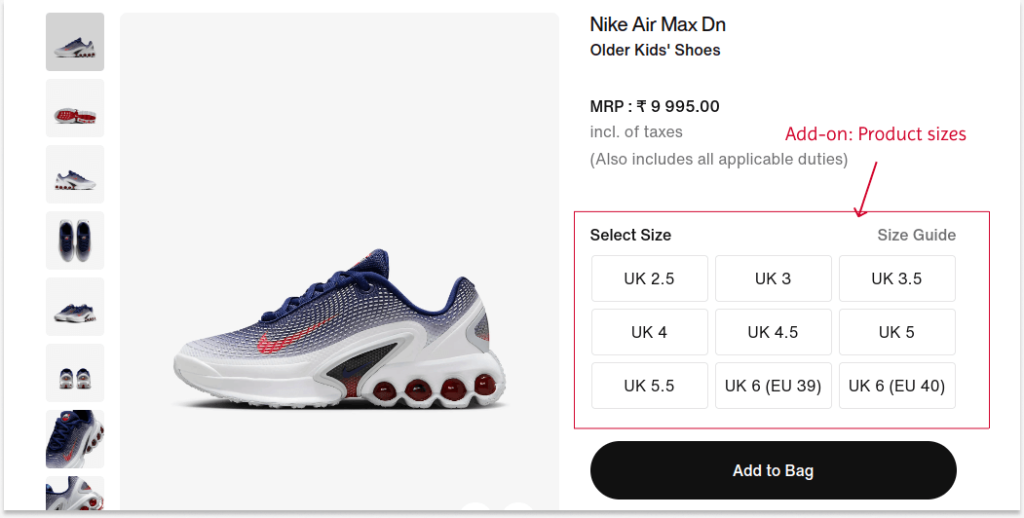
Using the add-on feature, Nike allows customers to purchase their favorite shoes in the right size, helping them buy comfortable shoes.
3. Nykaa’s Product Quantities as an Add-on
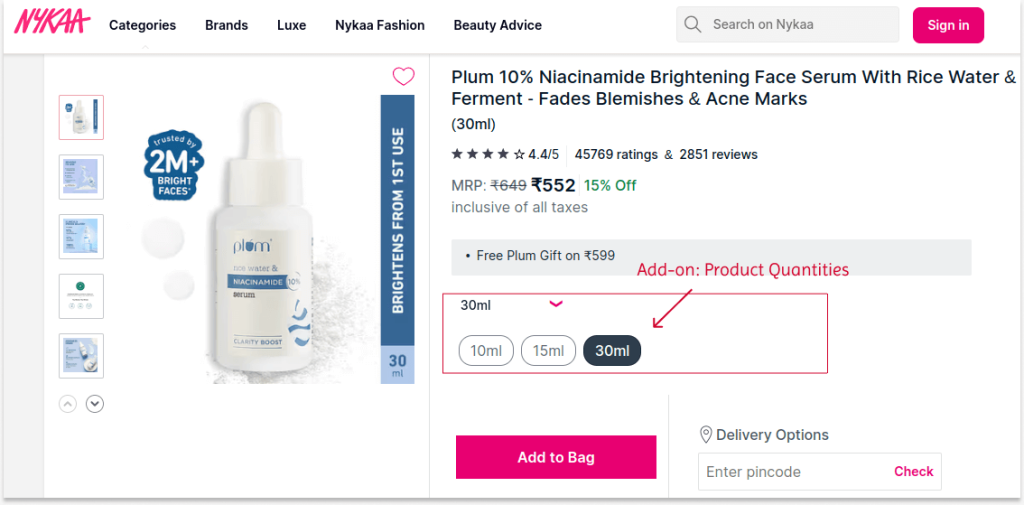
Nykaa also utilizes this product add-on section to allow customers to buy their cosmetic items based on the needed quantities. It helps customers to purchase cosmetics based on their usage and budget.
Like these brands, you can use the WooCommerce product add-on to help customers customize their product features, quantities, colors, or other attributes to elevate their shopping experience.
You can also gain product trust by offering warranty and customer service options to products with add-ons.
Offer free or discounted product add-ons using UpsellWP to increase customers’ cart value and sales.
WooCommerce Product add-ons help you offer customized product options that attract customers and meet their demands. This will increase your sales and revenue.
Showing the most relevant customization options or upsell suggestions is a must-try strategy to retain customers and grow your business.
You can also use the UpsellWP plugin to easily manage your product add-on campaigns and save time and effort.
A Few More Blogs To Increase Average Order Value:
To add options to your WooCommerce products, use a plugin like UpsellWP. It lets you create add-on campaigns and show customizable choices easily.
Add-on plugins like UpsellWP let you add custom fields to WooCommerce products, such as gift wrap, variations, or warranties, to boost engagement and sales.
With the default “Linked Products” upsell and cross-sell sections, you can easily add accessory suggestions to your products in WooCommerce.
You can organize your WooCommerce products by “Category”.
1. Go to “WordPress dashboard” -> “Products” -> “Categories”.
2. Add a new category or edit an existing one.
3. Now, navigate to the “Products” page and add a new product or edit existing products.
4. Select the category of the products and publish the changes.
Customers can find their products in the selected category.
You can use the UpsellWP plugin to show best-selling products as upsells or cross-sells. After installing this plugin:
Step 1: Create an engine:
1. Go to “WordPress dashboard” -> “UpsellWP” -> “Engines”.
2. Create a new engine and choose one of the recommendation engine types to show best-sellers.
3. In the “Filter” section, choose the “Best-selling products” condition and select the “sorting” order.
4. Save changes.
Step 2: Synchronize the engine with an upsell campaign:
1. Go to “UpsellWP” -> “Campaigns”.
2. Create a new upsell campaign.
3. Filter products to show upsell or cross-sell suggestions.
4. Choose the product suggestion method as “Use Recommendation Engine”.
5. Select the created engine and save changes.
Now, the plugin will automatically analyze the best-selling products based on their sales and demand and show them as upsells or cross-sells.