
A standard WooCommerce checkout spreads across multiple pages. Customers fill billing details on one page, then move to another for payment. This creates friction and increases cart abandonment rates.
A WooCommerce one page checkout displays everything on a single screen. Customers see their cart, billing fields, shipping options, and payment methods together. They complete their purchase faster.
Studies show that 70% of shoppers abandon their carts before completing checkout. A good one page checkout balances simplicity with functionality. You need to show all necessary information without overwhelming customers. The layout should feel natural and easy to scan.
WooCommerce offers an official “WooCommerce One page checkout” plugin and offers three ways to create a one page checkout.
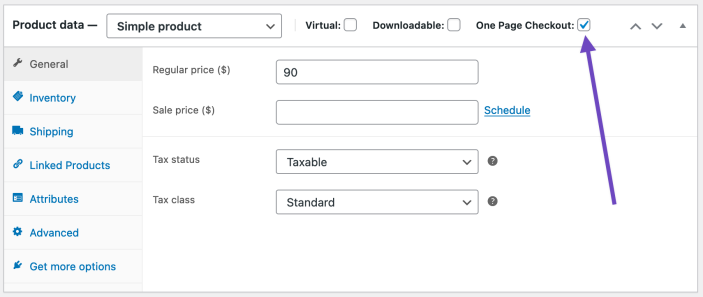
This method turns individual product pages into checkout pages. Customers see the checkout form directly on the product page. They complete their purchase without leaving.
Step by Step:

For Variable Products:
Variable products need special handling. Enable one page checkout for all variations or select specific ones. Go to Product Data > Variations.
Click Expand to see all variations. Check the One Page Checkout box for variations you want. Update the product to save changes.
This method works best when you have featured products. Use it for high margin items or special promotions. Customers get a streamlined buying experience.
Shortcodes let you build dedicated one page checkout pages. You can display multiple products on a single checkout page. This works great for product bundles or themed collections.
Basic Shortcode Setup:
Create a new page in WordPress. Go to Pages > Add New. Give your page a clear title like “Quick Checkout” or “Express Order”.
Add this basic shortcode to display products:
[woocommerce_one_page_checkout product_ids=”123,456,789“]
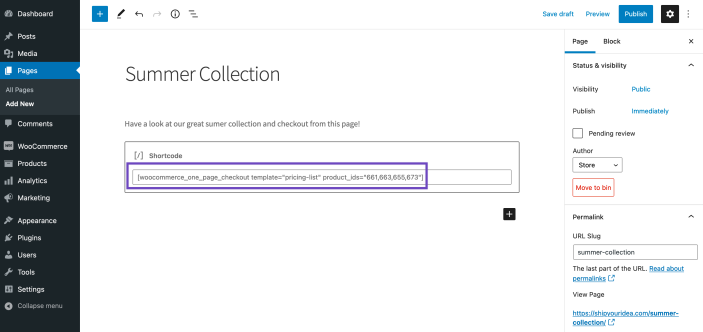
Replace the numbers with your actual product IDs. Find product IDs in your Products list. They appear in the URL when you edit a product.
Shortcode Attributes:
The graphical interface simplifies shortcode creation. You don’t need to remember product IDs or attribute names. This method only works with the Classic WordPress editor.
Setup Steps:
When This Method Works Best:
Use the graphical interface if you’re not comfortable with code. It prevents syntax errors in shortcodes. You see exactly what products you’re adding.
This method saves time when creating multiple checkout pages. You don’t need to look up product IDs repeatedly. The interface handles everything.
Plugins offer more features than the default WooCommerce methods. They provide advanced customization, better mobile optimization, and conversion tools. Most plugins work alongside WooCommerce’s native functionality.
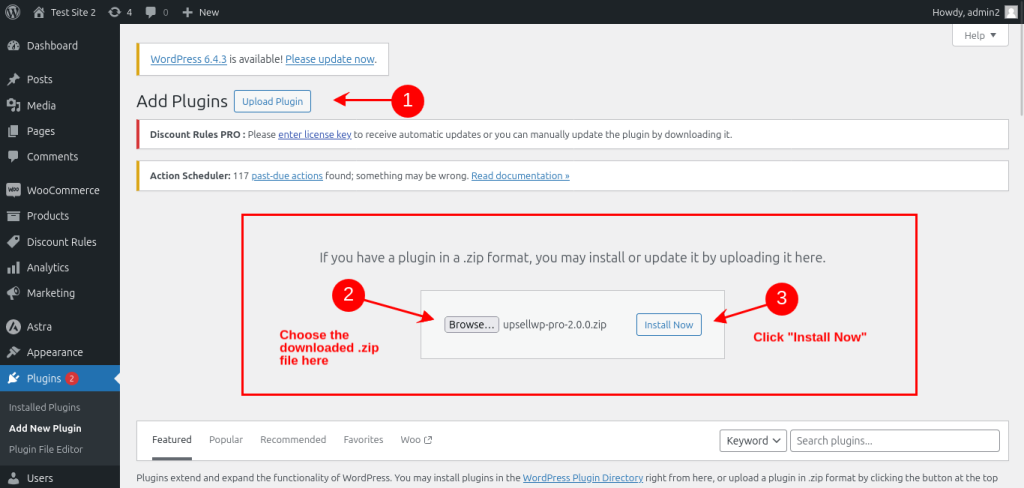
Log into your WordPress dashboard. Navigate to Plugins > Add New. Search for your chosen checkout plugin.
Click Install Now, then Activate. The plugin adds a new menu item to your dashboard.
Go to the plugin settings page. Browse through available checkout templates. Each template serves different store types.
Select a template that matches your brand style. You can preview templates before applying them. Click Apply to activate your chosen design.
Open the General Settings tab. Enable the one page checkout option. This replaces your default checkout page.
Set your preferred checkout flow. Choose between single column or two column layouts. Single column works better on mobile devices.
Recommended Settings:
Save your changes after each setting update.
Navigate to the Fields Editor section. You’ll see all default WooCommerce checkout fields. Remove unnecessary fields to speed up checkout.
Essential Fields Only:
Optional fields increase abandonment rates. Remove the company field unless you sell B2B. Make the phone field optional unless you need it for delivery.
Reorder fields by dragging them. Put email at the top. Customers can recover their cart if they abandon checkout.
Trust elements increase conversion rates by 15 to 30%. Customers need to feel secure before entering payment information.
Add these trust elements to your checkout:
Place trust badges near the payment section. This is where customers feel most anxious.
Express checkout buttons let customers skip form filling. Services like PayPal, Apple Pay, and Google Pay store customer information.
Enable all available express payment methods. Place buttons above the checkout form. Customers see them immediately.
Express checkout can increase conversions by 20%. Mobile users especially prefer these options.
Order bumps display related products during checkout. Customers add items with a single click. This increases your average order value.
Best Products for Order Bumps:
Keep order bumps relevant. Don’t overwhelm customers with too many options. One or two suggestions work best.
Testing prevents costly errors. Process test orders using different payment methods. Check both desktop and mobile views.
Test These Scenarios:
Ask friends or family to test your checkout. Fresh eyes catch issues you might miss. Fix any problems before going live.
UpsellWP helps you add strategic upsell and cross-sell offers directly to your checkout page. The plugin works with any one page checkout solution. You can display relevant offers without slowing down your checkout process.
The free version includes basic checkout upsell features. Premium plans unlock advanced targeting, A/B testing, and detailed analytics. Start with the free version to test functionality.
Go to Plugins > Add New in your WordPress dashboard. Search for “UpsellWP” in the plugin directory. Click Install Now, then Activate.
Navigate to UpsellWP > Campaigns > Create New Campaign > Checkout upsell >Add offer
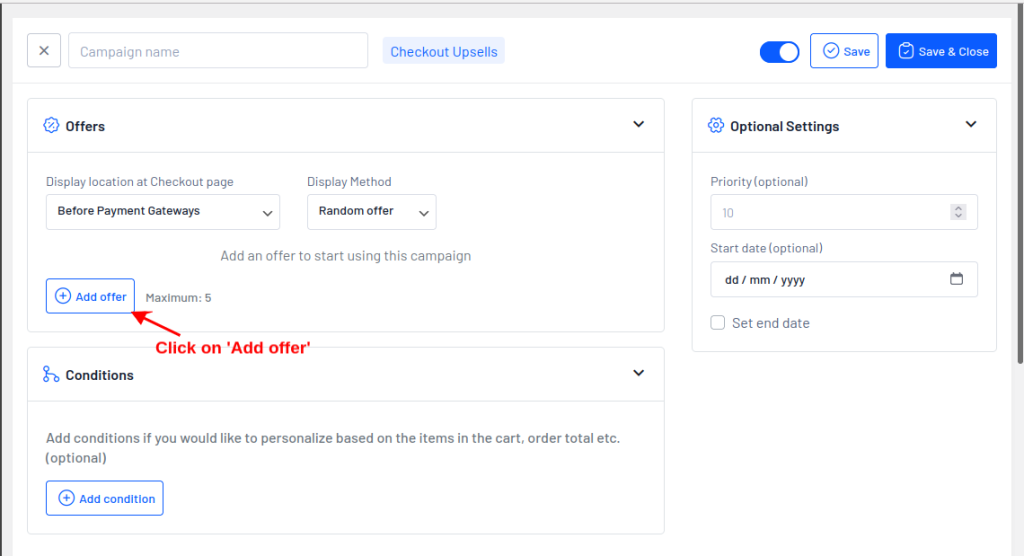
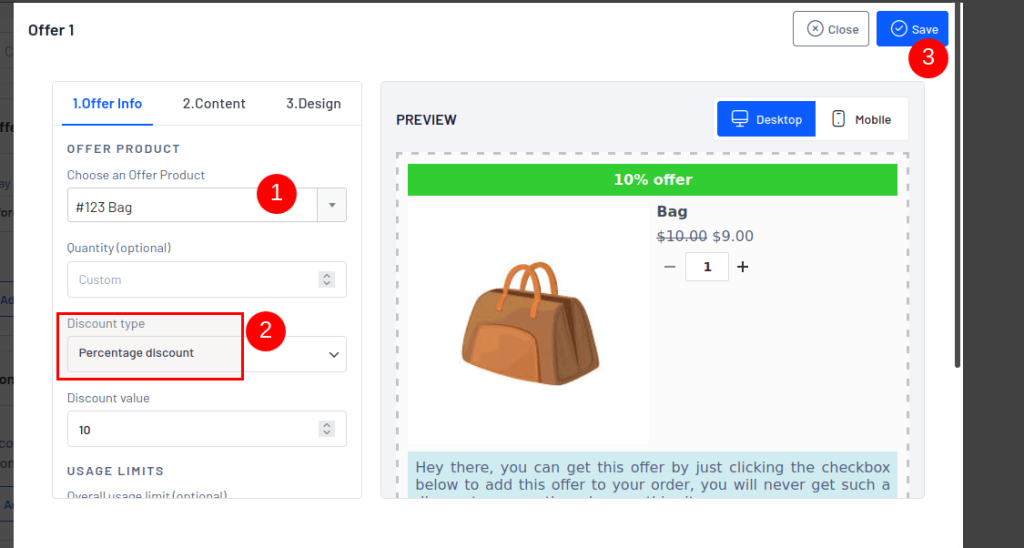

Now, we have successfully created an offer, Let see how it works on the checkout page.
Also read: Best WooCommerce Upselling plugins
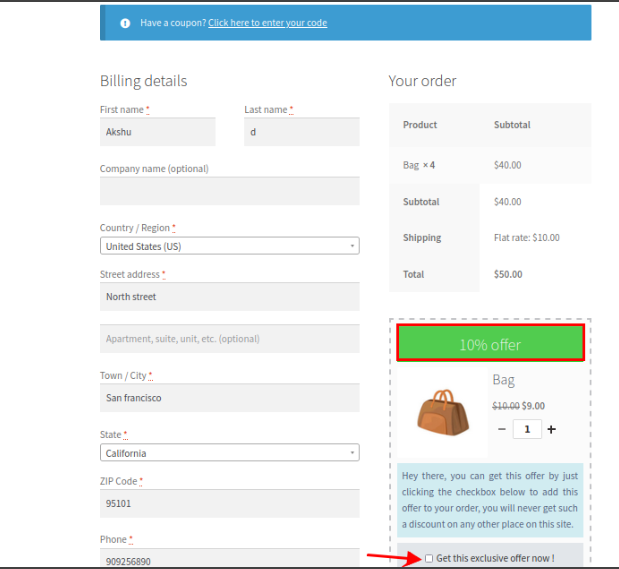
Increase your order value by offering timely upsell offers in the checkout page using UpsellWP plugin.
Store owners make predictable mistakes when setting up one page checkout. These errors hurt conversion rates. You can avoid them easily.
Every extra field decreases conversions. Some stores ask for information they never use. Birthday fields, company names, and fax numbers waste customer time.
Only collect data you absolutely need. Think about each field carefully. Can you operate without it? Remove it.
Unexpected costs cause 48% of cart abandonments. Show shipping costs early in the checkout process. Don’t surprise customers at the final step.
Calculate shipping costs immediately when customers enter their address. Display the total prominently. Let customers change shipping methods easily.
Desktop focused checkout pages fail on mobile. Tiny buttons, small text, and complex layouts frustrate phone users. More than half your customers shop on mobile devices.
Test your checkout on real phones. Use your own device to complete a purchase. If you struggle, your customers will too.
Forced account creation kills conversions. Many customers want to buy without creating an account. They don’t want another password to remember.
Offer guest checkout prominently. You can still collect email addresses for marketing. Ask customers to create an account after purchase, not before.
Increase your sales at every step by creating pre-purchase checkout upsells with the UpsellWP’s Checkout upsell campaign
WooCommerce One page checkout removes barriers between customers and completed sales. You reduce cart abandonment and increase conversion rates. The setup process takes less than an hour.
Your checkout page directly impacts revenue. Invest time in getting it right. The conversion rate increases will justify every minute spent optimizing.
To use WooCommerce one page checkout,
1. Install “WooCommerce One Page Checkout”
2. After activation, configure the plugin settings to display product selection, cart details, and checkout fields on a single page.
A single page checkout consolidates the entire purchasing process onto one page, combining product selection, cart review, billing information, shipping details, and payment options. Unlike traditional multi-step checkouts, customers complete their purchase without navigating between different pages.
WooCommerce automatically creates a checkout page during installation. To customize it, go to WooCommerce > Settings > Advanced and select your checkout page. You can edit the page content through Pages > Checkout in WordPress dashboard. Add shortcode woocommerce_checkout to any page to make it your checkout page.
Customize single product pages through Appearance > Customize > WooCommerce > Product Pages for basic changes. For advanced customization, use page builders like Elementor or Beaver Builder with WooCommerce integration. Alternatively, edit product-single.php template file in your theme, add custom CSS, or use hooks and filters. Many themes offer built-in product page customization options without coding.
Customize checkout pages using WooCommerce settings, checkout field editor plugins, or custom code. Navigate to WooCommerce > Settings > Checkout for basic options. Use plugins like “Checkout Field Editor” to add, remove, or modify fields. For design changes, apply custom CSS or use page builders.

Like our insights? Click the badge to add UpsellWP as your preferred source on Google.